With the release of PowerHome 2.1.5, an entirely new support system for Insteon Thermostats has been implemented.
While this is a substantial benefit, it unfortunately means that old (pre 2.1.5) PowerHome configurations will no longer work.
This tutorial documents the process for migrating, or creating new, thermostat configurations.
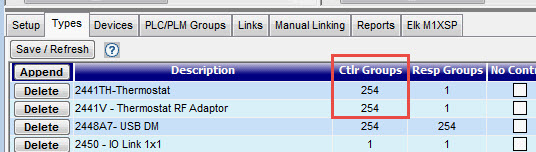
If you are creating a NEW thermostat installation, then the first thing to do is to Find your STAT device in the Insteon Explorer "Types" Tab and Modify the Ctlr Groups entry for all Insteon stats you will be using. The default value is usually "1". Change this to "254"
Now Open the Devices Tab. If you are upgrading from an earlier version of PH then you may skip this step, as your devices are already entered in the database. Configure all of your STAT devices as exampled below.

Enter an ID and Description (Usually the same. The ID is used in Formulas to identify the device, and the Description is what appears in the Device Status window. (Most users find it most usefull to just make the two fields the same.)
Enter the STAT Insteon Address, the Location,
and the "Device Type." Because you are
setting up the thermostat as an Analog device, you will also want to
check the Don't Display attribute to prevent having
this Insteon device appear as a duplicate in the Analog Device entries
in the Device Status window. If you are not sure what the Device Type
is, then select the * Auto Discovery * parameter in the Device Type cell
and then click on the "Save/Refresh" button. Once the auto discovery
process completes successfully, click on the Save/Refresh button again
to refresh the window. The correct Device
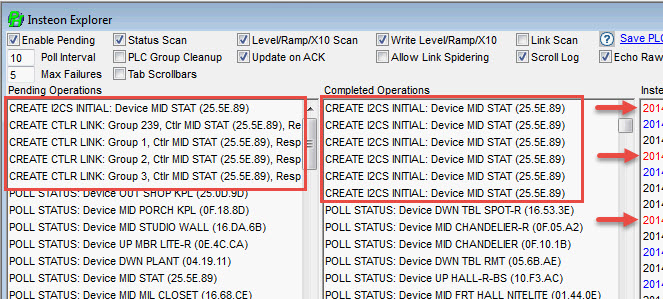
After clicking on the Save/Refrresh button, look at the Pending and Completed Operations windows in Insteon Explorer. If the Save/Refresh operation does not complete succecssfully you will see something as shown below where the "CREATE I2CS INITIAL:" operation keeps trying and trying without success. You will see red entries in the Insteon Raw Log window (red arrows) indicating NAK responses from the device, because a connection cannot be made. This occurs because some I2CS Insteon devices contain firewalls to protect against program modification.
If your Save/Refresh operation went successfully, then you should see in the Completed Operations window a single CREATE I2CS INITIAL entrty with several CREATE CTLR LINK entries above it (one for each Controller Group you defined.
If you encounter blocked access to your I2CS device, then the following proceedure must be used to get around the I2CS device firewall protection.
Go to the Devices Tab and change the IEngine entry for the I2CS device from I2CS to I2. Do a Save/Refresh. This should allow the CREATE CTLR LINK operations to successfully run. Once they do, change the IEngine type back to I2CS and do another Save/Refresh.
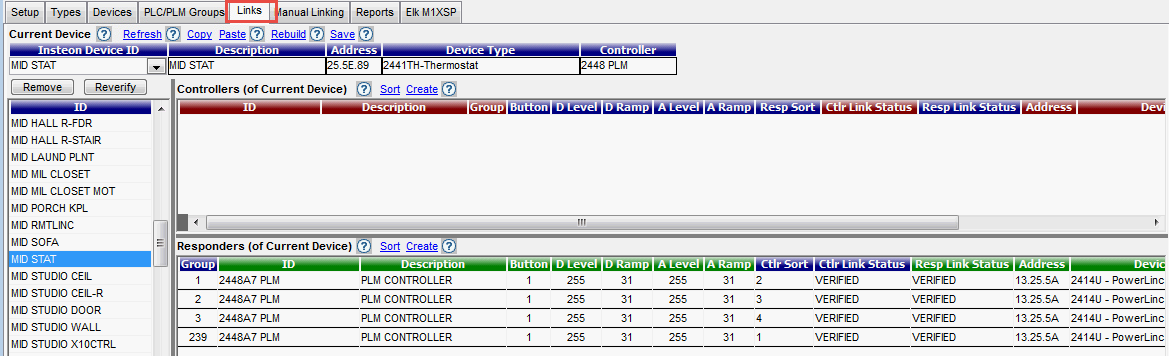
Now open the PH Explorer Links tab and set up the Links between each STAT and and your Insteon Controller.
PowerHome now has support that causes Thermostat devices to update within PowerHome as items change so you don't have to rely solely on polling. (See setting up Triggers, below.) With the thermostat as the current device, you'll want to create responder links with the STAT as the controller and the PLM as responder. The first link created should be from group 239. Next create the group 1 followed by group 2 followed by group 3.
You can control the order of group creation (and thus Trigger handling priority) by using the CTRL Sort field Place a 1 in the 239 group, a 2 in the 1 group, etc and place a 9 in all other groups as the order doesnt really matter after that).
You now have the Device configuration parameters all set up, and you are ready to use it.
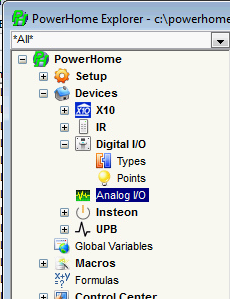
From PowerHome Explorer open the Analog I/O window...
and Add the five Insteon Stat attributes that can be sensed (Cool Set Point, Heat Set Point, Humidity, Stat Mode, and Temp) for each of your thermostat devices.
Create ID Names to use with Macros, Triggers, etc. and enter a description for each item. This Description will be used in the Device Status window to describe the item. Select the I/O, and Controller parameters from the pull-down lists. Enter the IP Address for the STAT (this will change to the Device ID string in later releases of PH) and a poll interval (in seconds) to repeatedly check the status of each item. Enter a string in the Message field that you want to appear in the Device Status window, after the parameter value. The Poll Intvl field allows you to specify how often PowerHome should manually "poll" for the values from the thermostat. This column is in seconds. From the examples below, a Poll Interval of 300 is used which equates to 5 minutes.

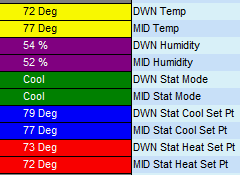
Device Status Window showing "Message" strings appended to parameter values...
This completes the setup of the Thermostats.
Reinit/Restart PowerHome to assure all changes are locked in and saved.
You can now read/write STAT values using the following PH Functions...
ph_getanalog("ID")
ph_setanalogout("ID","TYPE/VALUE")
where:
ID is the ID you assigned the thermostat in the THERMOSTATS screen.
VALUE is a string containing the value you wish to set.
TYPE is a string describing predefined one of the attributes you have previously defined in the "Analog Input/Output Detail" Table. (See Detail Table figure above.)
If you query a Stat with a Stat Mode command, it will return one of these string values ...
Off
Heat
Cool
Auto
Fan
Program Auto
Program Heat
Program Cool
The information returned by the ph_getanalog function will be a string value. In the case of values such as temperature and cool setpoint, this string value will be a numeric (eg. 37, 72, 78, etc). You will need to use a function such as integer() to convert the string to a numeric for further processing. Executing ph_getanalog for the thermostat mode will return values such as "Off", "Cool", "Heat", etc. Unlike previous PowerHome Insteon Thermostat routines, the data values for setpoint and termperature are now direct reading and do not have to be divided by two to obtain the correct value.
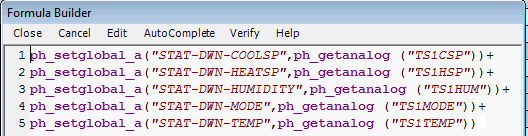
For instance the following reads all of the "TS1" thermostat parameters, and writes each to a Global Variable (which you have already defined in the Global Variables window...
NOTE: The ph_getanalog function ONLY returns text values. In the case of setpoint and temps, the text value returned will be numeric but it is still a text value in terms of a formula. For example...
if(ph_getanalog("TS1CSP") < 78,1,0)
The above formula will fail because you're comparing text to a numeric. You would need to use this instead...
if(integer(ph_getanalog("TS1CSP")) < 78,1,0)
This function is now proper because a number is now compared to another number.
The following writes a new Heat Setpoint value to the "TS2" thermostat.
ph_setanalogout("TS2HSP","72")
Its important to note that the second value is a string instead of a numeric value. This is because the ph_setanalogout function is looking for the calculated value which can be anything. In the case of the thermostat device types, the calculated value and the raw value are essentially the same.
NOTE: In order to set a heat/cool temperature setting, the Stat must be in the appropriate State. Thus the above TS2HSP would fail unless the Stat is in "Heat" mode.
The proper sequence would be...
ph_setanalogout("TS2MODE","Heat")
ph_setanalogout("TS2HSP","72")
In order to have the changing thermostat values updated into your Global variables, or in your Control Center or web page, appropriate Triggers must be defined in the Triggers window.
NOTE: When the Trigger is activated, TEMP4 will contain the appropriate RAW value read from the STAT for use in setting Global Variables, or in formula actions you may wish to take. The best way to fetch the TEMP4 value is to use the ph_getvar(2,4) function. The TEMP5 variable will contain the calculated value read from the STAT. In the case of temps and setpoints, the raw and calculated values are the same. In the case of the thermostat mode, TEMP4 will contain the raw value 2 while TEMP5 will contain the calculated value "Cool". The best way to fetch the TEMP5 value is to use ph_getvar(2,5).
A typical setup might look like this...

Note the "Action Type", "Trigger Type", and "Trigger ID" are all pull-down selections. Everything else in the blue background areas, you will enter yourself. The grayed area values are automatically inserted by your pull-down choices.
A typical Action would be this...
ph_setglobal_s("STAT-DWN-COOLSP",ph_getvar_s(2,4))+
ph_setglobal_s("STAT-DWN-SET",ph_getglobal_s("STAT-DWN-COOLSP"))
which reads the contents of TEMP4 and writes it to the Global "STAT-DWN-COOLSP" and also updates the STAT-DWN-SET variable which is used as a single convenient setpoint variable that holds either the Heat or the Cool setpoint, as appropriate for the current STAT Mode.
At this point, you should have a working Insteon Thermostat setup in PowerHome. From this base, you are now ready to read and control your thermostats as dictated by your needs and imagination.